Note: There is more in a newer post on this topic: Part 6
In our last installment (Part 4) of this long "saga," we ran into some roadblocks with Temboo (namely that it doesn't allow enough free "calls" to it's "choreos" to support checking for email commands at a reasonable rate). So, I "switched gears" to a new solution: MQTT, IBM's Internet of Things Foundation, and Bluemix (Programming on the cloud).
I found this tutorial and started working though it
Build a cloud-ready temperature sensor with the Arduino Uno and the IBM IoT Foundation, Part 1: Build the circuit and set up the environment
This is a good tutorial because it takes you step by step through lots of things to learn about the hardware and the software.
Different Temperature Sensor
I have a different temperature sensor, so I had to make some changes.. I just changed the "sketch" (program) to not call the code to get temperature and humidity and I just added a little bit to the temperature every loop so it went up by 0.1 degree.
Lesson Learned: How to Add Arduino Libraries
I ran into an issue with the MQTT library. When I followed the links to download it from Github, I tried to add the library from the Arduino IDE by importing the .zip file I had downloaded. I kept getting errors that the header file was not found (pubsubclient.h). After hours of being stuck on this (in my spare time over two days), I realized that I needed to unzip the .zip file and only move the one pubsub folder into the library folder for the Arduino IDE to find it and use it.
Needed to fix a line of the Arduino Code
I also needed to fix a line in the arduino code. This line:
"messaging.quickstart.internetofthings.ibmcloud.com"
needed to be changed to
"quickstart.messaging.internetofthings.ibmcloud.com"
(you'll find this change in the comments)
I see data!
On the 2nd part of the tutorial, I was able to use the quickstart (although the screens shown in the tutorial changed a bit) and I could see the data being displayed! Now, that was exciting!
Asking Questions about how to get it working with Node-RED
With all of this excitement of seeing my data, I then started right away on part 3 of the tutorial! It has several steps. The screen pictures in the tutorial were different than the current screens. I guess the screens changed a bit. Finally, when I tried to "register" the device (the Arduino), there was no such dropdown that allowed me to register the Arduino as was shown in the tutorial. I asked by posting comments on part 2 of the tutorial and was told just to create my own device and skip putting in all the information that it asked for.
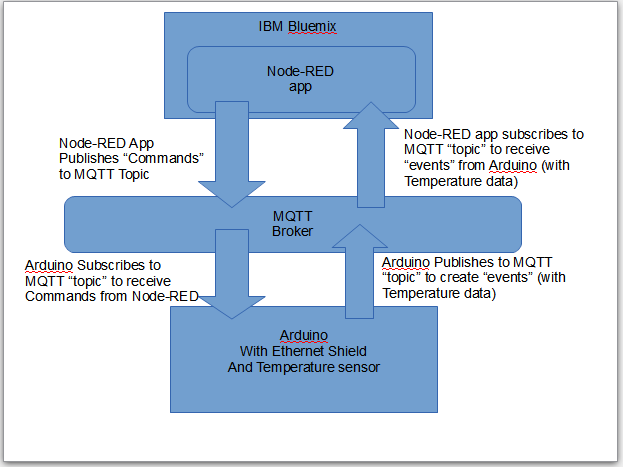
How Does MQTT Publish and Subscribe work?
I wanted to understand more about MQTT. I got some help from the forums and they pointed me to this for an understanding of The Internet of Things Foundation (publishing events and commands). I found out from reading it that my Arduino with the Ethernet Shield and Temperature Sensor (called a "Device") will be publishing "events." I also found out that the Bluemix app (which I will program in Node-RED) will be publishing "Commands" to the Arduino "device".See the graphic above.
Learning how to use Node-RED and Bluemix:
I learned about Node-RED on Bluemix using this YouTube tutorial (be sure to read the comments for changes). I created an app following the directions there. It uses a temperature sensor simulator at:
https://quickstart.internetofthings.ibmcloud.com/iotsensor/
This was fun to play with! I could change the temperature and watch how the Node-RED code worked.
What's Next?
Now that I understand Node-RED a little and MQTT a little, I want to next build a simple application on the Arduino and in Node-RED that will allow me to talk in two directions. Stay turned for part 6 of my "Cabin Fever" journey.

No comments:
Post a Comment